
3D Laser Engraving: Master How It’s Done
3D engraving roots back to ancient civilizations where it was a revered process. In bygone eras, artisans chiseled intricate designs onto stone, wood, and metal, using rudimentary tools like hammers, chisels, and burins. These age-old techniques were labor-intensive, requiring immense skill, patience, and a keen eye for detail.
Fast forward to the present day, the essence of 3D engraving remains unchanged but tools have undergone a revolutionary transformation. Modern laser engraving technology has replaced the traditional tools, offering precision, speed, and versatility that was once deemed impossible.

Next comes this article, which aims to introduce you to the 3D engraving process and how it is carried out with modern software and laser engraving machines. And for those of you passionate about DIY crafts and looking for the perfect tool, I will share insights into the best 3D laser engraving machine.
In This Article
- What is 3D Laser Engraving?
- Materials Compatible With 3D Laser Engraving
- The Process of 3D Laser Engraving
- Tips to Improve 3D Laser Engraving Results
- Best 3D Laser Engraving Machine
- FAQs
- Conclusion
What is 3D Laser Engraving?
At its core, 3D laser engraving is the precise removal of material at variable depths using a high-intensity laser beam. Rather than operating at the same power across the entire surface, the laser intensity is dynamically controlled to carve away more material wherever deeper etching is desired.
To put it simply, this type of engraving removes the materials in all three directions. The laser head moves across the workpiece in horizontal and vertical directions, while the third dimension, depth, is varied through laser intensity.
The 3D engraving process is also referred to as relief engraving. The term is especially common for 3D engraving wood where a deeply engraved art piece, with varied height points, is created.
The Role of Grayscale Images in 3D Laser Engraving
Now, what governs the depth? The grayscale images or height maps. Grayscale refers to shades of gray that span from black at one end to white at the other end. In grayscale digital images, each pixel carries a brightness value ranging from 0 (black) to 255 (white). In between are 254 levels of gray.
These images lack any color information, and detail is conveyed purely based on brightness patterns across the pixels. They are fed as input to the laser engravers, where the brightness levels get translated into etching depths. Darker grays and blacks indicate a deeper engraving, while lighter grays create shallower etching. White areas are left untouched.
During the engraving process, as the laser head scans over the material, the laser power changes based on the shade of gray underneath it. With 256 levels of gray to leverage, smooth slopes, subtle curves, and dramatic pits and peaks can be carved out by eliminating material accordingly. This gives creations a true three-dimensional profile.
One may ask about grayscale height maps, where to get them? You can find them on the internet or generate them with 3D rendering software. Remember, a great height map is what makes an ordinary engraving extraordinary. So, do take time optimizing it.
3D Laser Engraving vs 2D Laser Engraving
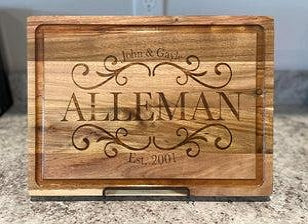
2D Engraved Cutting Board

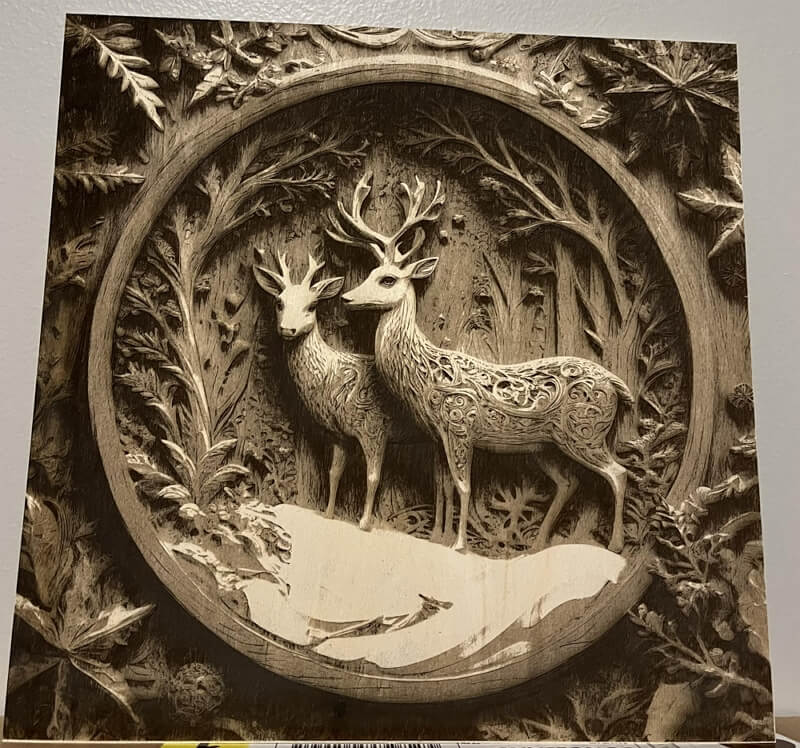
3D Engraved Ornament
The key contrast between 3D engraving and standard 2D laser engraving is the ability to adjust the power and depth. In 2D laser engraving, the laser operates at a single fixed power and depth. The entire engraving area is etched to the same depth. This creates engraved designs that are flat and do not have any contours.
3D laser engraving enables finer control over the laser power across the work area. By modulating the power, varying heights and depths can be achieved. This allows the creation of 3D structures with overhangs and curved surfaces.
Benefits of 3D Relief Engraving
Moving from flat 2D laser etching to contoured 3D etching brings some major advantages:
Greater Sense of Realism - With the interplay of highlights and shadows across 3D shapes, engraved objects and artwork feel much more lifelike and organic. The extra visual information gives designs a boost in perceptual quality.
Uniting Form and Function - For products like jewelry or industrial molds, functional advantages arise from 3D contours that can fit or grip better ergonomically.
Eye-Catching Depth - A 3D engraving draws the eye into the image, creating attention-grabbing centerpieces and focal points. Depth adds interest.
Next Level Customization - Because designs can be formed in three dimensions, 3D laser engraving allows for detailed customization and personalized shaping.
Sub-Surface Laser Engraving
2D and 3D engraving are surface laser engraving processes as the material is removed from the surface. There’s another special engraving technique called Sub Surface Laser Engraving (SSLE) that allows for the creation of intricate designs inside transparent materials, most commonly glass or crystal.

Horse Bubblegram ©RFHLaser
In this process, a laser beam is focused on specific points within the material. At these targeted points, the laser induces localized damage or micro-fractures. As the laser progresses, these micro-fractures cumulatively form a three-dimensional image or pattern. The result is a stunning internal engraving that appears to float within the material.
In Sub Surface Laser Engraving (SSLE), the internal structure is altered to form the design but the external surface remarkably remains pristine and unmarred.
Materials Compatible With 3D Laser Engraving
One of the appeals of laser engraving is the wide range of materials it can mark. Laser light can etch into and darken the surface of many materials. But which materials are best suited for detailed 3D laser engraving?
Ideally, the material should absorb laser energy efficiently, resist fracturing from rapid heating, and have a fine matte surface texture. Wood, plastics, metals, (iron, stainless steel, and titanium), leather, painted glass, ceramics, and stone are outstanding candidates. Mirror-like finishes and clear acrylics are not recommended.
Remember that the choice of material also impacts the safe laser settings. Harder materials like metals and stone require higher power to penetrate deeper while sensitive materials like wood need lower power to avoid scorching.
The Process of 3D Laser Engraving
We covered a brief overview of the 3d laser engraving process at the start. Here’s a break down of that process in simple steps:
Step 1: Create a Grayscale Height Map
Before the actual engraving begins, a grayscale image that represents the depth map of the engraving is created. This image serves as a guide for the laser, dictating how deep it should be engraved at any given point.
How to Make 3D Grayscale Images for 3D Engraving?
- To generate a 3D grayscale image, start with a 3D model of the design.
- Get specialized software like Adobe Photoshop, and import this model image into it.
- Convert it into grayscale and then invert it. You may further tweak brightness levels and contrast to sharpen the image.
- If you have an STL file for a 3D model, you may directly convert it into a PNG heightmap with this site.
Tip: Use xTool's AImake to generate ready-to-use designs for 3D engraving.

Step 2: Send the Grayscale Image to the Laser Engraving Machine
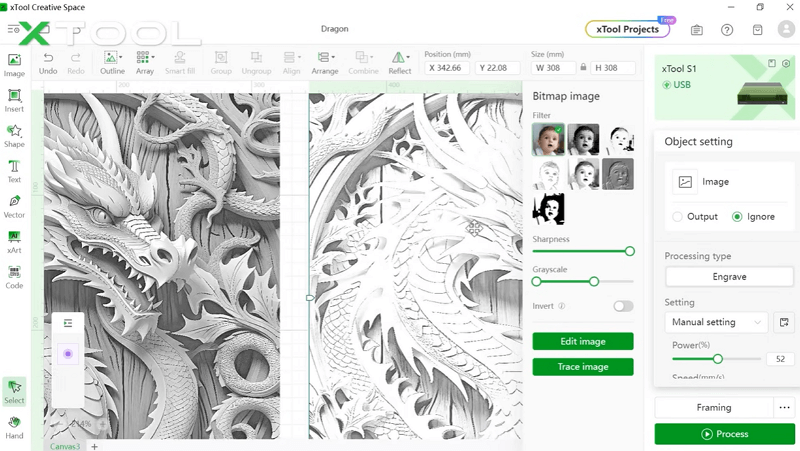
Once the grayscale image is ready, it is sent to the laser engraving machine. Here, the operator sets specific parameters such as the laser’s power, speed, and passes. These settings are crucial as they determine the quality and precision of the engraving.
The grayscale image serves as a map, guiding the laser's actions. If you’re using xTool, use our recommended material-based settings to get optimized results.
Step 3: Engraving the Material
With everything set, the engraving begins. The laser beam moves over the material, adjusting its power based on the grayscale image.
Darker areas of the image instruct the laser to use more power, resulting in deeper engraving. Conversely, lighter areas might receive minimal power or even none at all, where the region is completely white. This leads to shallower engravings or untouched surfaces.
Tips to Improve 3D Laser Engraving Results
Laser engraving is an art, and one cannot master it in a day. It takes time to learn, experiment, and retry until you find optimal parameters for the engraving. To point you in the right direction, and get you aware of critical things. Here are a few tips from our side:
1. Grayscale Height Map is Key
The essence of 3D laser engraving lies in the grayscale height map. While creating an accurate grayscale height map can be challenging, it is this very map that dictates the laser’s actions. The depth, intricacy, and precision of the engraving are all determined by this image. Investing time and effort into perfecting this map will significantly enhance the final result.
2. Getting the Right Design Software
The software you use plays a crucial role in determining the quality of your engravings. Select a platform that offers versatility and compatibility with your engraving machine. You may go with the famous Lightburn software or xTool Creative Space (XCS).
3. Choosing the Right Laser Type
If you’re using a diode laser, you may get to see the blue light and IR options. Blue light is suitable for materials like wood and leather, while IR light is ideal for metals.
4. Setting the Right Parameters
Along with the grayscale map, setting the right parameters is the key. If you’re using XCS, you may encounter these laser parameters, set them based on your requirements:
- Bitmap Mode: We offer seven different bitmap modes, each for various image scenarios. For instance, Jarvis mode is recommended for infrared light, while grayscale mode is ideal for blue light.
- DPI (Dots Per Inch): DPI is not just the pixel density; it’s actually the density of dots the engraver can deliver in a linear inch. This influences the detail and appearance of the engraved image. Ensure you set the DPI appropriately based on the image's pixel density.
- Power: Power settings, ranging from 1 to 100%, impact the depth of the engraving. More minimum power means you will get more crisper and detailed designs. However, you may test out power on a scarp piece, before adjusting it.
- Number of Passes: The more passes, the deeper the engraving. However, with the right settings and machine power, a single pass can often achieve the desired effect.
5. Test Runs
You have spent money on buying materials. So, you don’t want to waste it due to setting errors, right? Before committing to the final piece, always conduct a test run on a scrap piece of the same material. This allows for any necessary adjustments and ensures that the final product meets expectations.
Best 3D Laser Engraving Machine
The “best” machine often depends on individual needs, the materials you're working with, and the scale of your operations. However, there are universal factors that one should consider to ensure they're making an informed decision.
- Engraving Area: Depending on the size of the items you plan to engrave, you'll need a machine with an appropriate engraving area. For larger projects, a machine with a more expansive work area is essential.
- Laser Power: The power of the laser determines how quickly and deeply it can engrave. Materials like metals require higher-power lasers, while softer materials like wood or acrylic can be engraved with lower-power lasers.
- Material Versatility: Some engravers are specialized for certain materials. However, you need an all-rounder machine, which can at least handle the materials you commonly work with.
- Speed: If you’re running a business or handling bulk orders, engraving speed can significantly impact productivity.
- Add-On Features: Some machines come with additional features that can enhance the engraving process. This could include extra equipment for rotary engraving, an air assist set, or multiple laser modules for different materials.
- Safety Features: Given the nature of laser engraving, there’s always a risk of fire. Enclosed machines equipped with fire alarms and smoke purifiers are ideal.
xTool F2 Ultra: The AI-Powered 3D Laser Engraver
3D engraving, as stated, requires deeper and more precise cuts. In terms of power and precision, there’s rarely another better option on the market than the xTool F2 Ultra – the world’s first dual laser engraver featuring a 60W MOPA and 40W Diode laser module.
It comes with top power in both the diode and fiber laser segments. For plastics and metal 3D engraving, it features a 60W MOPA laser, a type of fiber laser known for its customization (in frequency, pulse width) and power.
Additionally, for other materials such as wood, acrylic, glass, leather, and more, it includes a 40W diode.
Besides power, the area where the F2 Ultra shines is speed. Although other fiber lasers on the market can perform 3D engraving, nothing is quicker than the F2 Ultra.
With engraving speeds over 15,000 mm/s, it is 2 to 3 times faster than its counterparts. Our tests showed that a 3D engraving job on a small coin took 5 hours and 33 minutes with another fiber laser, while the F2 completed it in just 1 hour and 58 minutes.

Another highlight is the integration of AI, which has made the whole process seamless for beginners.
First, the AI-powered dual cameras offer pinpoint accuracy up to 0.02mm. Design? It can be created via text within the software using the AI generator. Image layers can be auto-segmented. Settings can also be auto-adjusted.
Engraving on curved contours is also handled the same way.
If we talk about space, it’s pretty decent considering it’s a compact-category laser. The basic working area is 220 by 220mm. Most engraving projects, like coins, stamps, etc., can be easily done.
However, if you slightly want more length or plan to handle multiple items in a batch, the conveyor attachment is available, which expands the workspace to 220 by 500mm.
The xTool F2 Ultra comes fully assembled; you just need to do basic setup, and it’s ready for work. Safety-wise, no additional gear is required.
The machine comes enclosed with a laser-filtering lid, fumes are removed via a dedicated exhaust, and sensors automatically halt the machine if opened accidentally during operation.
So, all in all, it’s a powerful, secure machine; currently, the best and most recommended for deeper engraving jobs like 3D engraving.

xTool F1 Ultra: The Compact Fiber Laser Engraver
Another compact, slightly less powerful but still capable option for 3D engraving jobs is the xTool F1 Ultra. It is also a dual-laser engraver, combining a 20W fiber laser and a 20W diode laser.
This powerful fiber enables the xTool F1 Ultra to deep engrave metals and even cut thin sheet metal. This galvo-laser engraver can engrave at 10,000 mm/s, which is unmatched by other desktop laser engravers.
In terms of space, it is the largest galvo-laser engraver available, with a basic working area of 220 x 220 mm. This can be expanded to 500 x 220 mm with an auto-conveyer, which simplifies batch engraving. Materials placed on the conveyor are automatically recognized by the smart camera, which maps designs onto all items efficiently.

The device also supports Curve engraving thanks to the smart camera that adjusts the laser head according to the thickness and surface irregularities of the material. For cylindrical surfaces, the additional xTool RA2 Pro attachment is required.
Controls are straightforward. You can either utilize the user-friendly XCS or the popular Lightburn software. The XCS interface provides a workspace preview through the camera, gauges material thickness, and suggests preset parameters for optimal engraving results. Design mapping is a simple drag-and-drop process.
Safety features of the xTool F1 Ultra include a laser-filtering lid to prevent exposure to harmful laser emissions and an auto-shut-off mechanism that stops the machine if the lid is opened accidentally.
xTool S1: Most Powerful Diode Laser Engraver
xTool S1 is available in different power modules, 10W, 20W, and 40W. The top-of-the-line, 40W machine is currently the most powerful enclosed diode laser engraver on the market.
The flagship variant features eight 5.5W diode lasers that collectively produce 40W optical power. This power is ample for removing the material at certain depths. Besides power, it is capable of engraving at 600mm/s.
Safety, the key highlight, is hidden in S1’s name. It’s got a class 1 laser safety certification due to its multiple safety features. It comes in a fully enclosed design and has a lid-open safety stop, laser filtering lid, and 5-directional flame sensors.
With S1 you don’t have to worry about space. The internal working area, 23.93 by 15.16 inches, is almost 45% more than what most competitors offer. Well, that doesn’t end here. There’s an option to expand it with a separate passthrough slot, which enables engraving on sheets up to 118 inches long.
Unlike typical engravers that use camera systems for design placement, the S1 employs an advanced pinpoint positioning system. This allows users to mark various points for automatic layout creation and precise design mapping.
The S1 also excels in engraving on curved surfaces by sketching a 3D model of the object and dynamically adjusting focus for optimal engraving results.
When working on time-consuming 3D engraving projects, smoke and fumes are obvious. To tackle such situations, there’s an in-built high-performance smoke and exhaust system, which may be coupled with an air purifier if working in an enclosed environment.
Ease of use is another benefit, especially for beginners. The XCS software simplifies the operation with access to tutorials, pre-defined parameters, and thousands of project ideas, making the S1 an excellent choice for those new to engraving.
FAQs of 3D Laser Engraving
What is a 3D Laser Engraving Machine?
A 3D laser engraving machine is a specialized device that uses laser technology to engrave three-dimensional designs into various materials. Unlike traditional 2D engraving, 3D engraving creates depth. This allows for intricate designs that seem to ‘pop out’ or ‘recede into’ the material.
Can You 3D Engrave with Laser?
Yes, 3D engraving with a laser is not only possible but also widely practiced. The laser’s ability to adjust its power based on a grayscale image allows it to create engravings with varying depths, resulting in a three-dimensional effect on the material.
Can LightBurn Do 3D Engraving?
LightBurn doesn't do the engraving itself. Instead, it is a software platform designed to assist users in preparing and optimizing their designs for laser engraving. While LightBurn can process and send 3D engraving data to compatible laser machines, the actual engraving is carried out by the machine.
How to 3D Laser Engrave with Lightburn?
To 3D laser engrave with LightBurn:
- Import your grayscale design in LightBurn.
- Adjust the image settings, such as contrast and brightness, to optimize the depth effect.
- Set the laser parameters, ensuring they are compatible with the material you're using.
- Send the design to the laser engraver using LightBurn's interface.
Can You 3D Engrave with a Diode Laser?
Yes, you can 3D engrave with a diode laser. In fact, devices like the xTool D1 Pro are smart diode lasers designed to engrave various materials with precision. Diode lasers, when paired with the right software and settings, can produce detailed 3D engravings.
How Much Does a 3D Laser Engraver Cost?
The cost of a 3D laser engraver varies widely based on its capabilities, brand, and intended use. Small laser engraver machines, such as the xTool D1 Pro 5W, start at just $499. On the other hand, higher-end industrial machines, especially those using CO2 and fiber laser technologies, can cost as much as $500,000.
Conclusion
The modern 3D engraving is a seamless blend of ancient artistry and cutting-edge technology. While our ancestors laid the foundation with their hand-carved designs, today’s lasers have elevated this craft to new heights. The precision and efficiency brought by modern tools, such as the xTool D1 pro, have opened doors to endless possibilities.
As the craft continues to evolve, it beckons both DIY enthusiasts and professionals to dive deeper, experiment more, and push boundaries. With each passing day, the world of 3D engraving offers more to explore and marvel at. For the future, one thing remains sure: the art of 3D engraving will continue to inspire, innovate, and captivate.