Transferring a photo to simple piece of glass is a unique to decorate your living space. It is also a trending item that people would love to have and give to others on special occasions and events. There are several ways to transfer a photo to glass, but in this article, our focus is on laser engraving because it offers impeccable results. The accuracy and quality of the engraving are up to the mark.
If you are a laser enthusiast and want to try something creative and fun, transferring a photo on a piece of glass is a must. We will give you a complete step-by-step tutorial to transfer any photo or picture on a piece of glass without any hassle.
In This Article
- What is Laser Engraving?
- Can You Transfer a Photo to Glass with Laser Engraving?
- What Type of Laser Do You Need to Transfer a Photo to Glass?
- How to Transfer a Photo to Glass?
- Conclusion
What is Laser Engraving?
Laser engraving machines have a laser source that emits powerful beams. When these laser beams fall on the material, they rapidly raise the temperature of the affected area,converting the affected material directly from solid state to gas state. This removes some part of the material from its surface and leaves permanent marks on it. But when it comes to glass, it seems to be a bit different because of the composition and hardness of the glass.
Due to heat, the molecules of the material of glass expand, which creates cracks, microfractures, or a frosted appearance. If you feel the depth of the engraved or etched glass surface, it will be minimal because it is done on the micro surface level. However, the engraving looks clear and visible.

Can You Transfer a Photo to Glass with Laser Engraving?
Yes, you can transfer a photo to glass through laser engraving.
A laser engraving machine can engrave any pattern, intricate design, photo, or whatever you want on various materials, including glass. But keep in mind that not all laser machines are suitable for glass laser engraving. Only Diode and CO2 lasers can do the job. Secondly, the quality of engraving depends on the accuracy of the laser machine. The smaller the laser spot is, the better the accuracy will be.
The photo that you want to engrave on glass needs thorough editing to get the best results. There are some important things you need to consider.
Firstly, the resolution of the image plays an important role. If the resolution is too low, you will have left space and gaps in the image. On the other hand, if the resolution is too high, the frosting will be too deep and crowded. It will degrade the overall quality of the engraving. Choose the right resolution according to the size. You can go with 300-500 DPI, or whatever seems perfect.
The next important thing is the color of the image. It should be black and white, and the lighting should be equal. For that, you need to make gamma, contrast, and brightness adjustments.
The most important thing for the photo editing is inversion. You also need to invert the image in terms of color. It means that black should become white and vice versa. The laser will engrave the black area, and the white will remain untouched. You can also engrave without inversion, but it offers exceptional results.

Note: Horizontal flip is not necessary; it depends on your choice.
For the above edits, you can use any photo editing tool you like, such as GIMP, Adobe Photoshop, or ImagR. Other than these edits, you can crop the image, remove objects, or do whatever you need.
What Type of Laser Do You Need to Transfer a Photo to Glass?
We have mentioned earlier that Diode and CO2 lasers can engrave glass. Let’s discuss why and how these lasers do the job.
CO2 Lasers
A CO2 laser is the first choice for glass engraving. It is because the laser beams emitted have a wavelength of around 10,000 nm. This wavelength is easily absorbed by glass, so you can directly engrave it without any hassle. A desktop CO2 laser is more than enough for the job. You can go with a 30W or more powerful CO2 laser machine. But keep in mind that these laser machines are quite expensive compared to diode lasers.
Diode Lasers
Diode lasers can also engrave glass. They produce a blue laser, which has a wavelength of around 450-455nm. The problem with diode lasers is that the laser beams directly pass through the glass; they are not absorbed. Therefore, you cannot engrave glass directly using a diode laser. You need to use marking paper, paint, backing material, or similar things.
We have discussed that the frosted appearance on glass is due to heat, which starts molecular expansion on the surface. When the light passes through the glass without being absorbed, the temperature is not increased, and no heat is generated. Therefore, a backing material, paint, or marking paper is necessary to trap the heat.
These lasers are quite affordable compared to CO2 lasers. You can easily engrave glass using a diode laser if you know the right steps to do it. Let’s have a look at the detailed step-by-step guide.
How to Transfer a Photo to Glass?
We’re going to show you how to laser engrave a photo on glass with xTool D1 Pro. xTool D1 Pro is a diode laser, so it can transfer a photo to glass. But you need to use something to trap the heat. Marking paper and backing material are the easiest and quickest options. We will demonstrate both here.
Step 1: Get the image ready. Select a good-quality image for editing. You can edit the image through any software, but here, we have used ImagR, which is an online tool.
Go to the website and upload the image. Crop the image and then adjust its size, including DPI. Now, select the material, which is glass in our case. It will automatically generate a suitable image for glass engraving. After that, you can also make some advanced changes, such as gamma adjustment, sharpness, brightness, mirroring, etc.

Step 2: Your image is ready. Now, turn on the laser machine and connect it to the computer. Import the image to the laser engraving software. XCS can also help you resize the image and invert the black-and-white color. It means you can also edit the image directly on the software.
You need to enter the optimal engraving settings according to the image and machine. We are using xTool D1 Pro 20W. The settings are 100% power, 80mm/s speed, and 300 lines per cm. We have selected grayscale bitmap mode, but you can also select others. Some users have achieved great results with Atkinson and Jarvis modes.
You might need to try a few times to get the optimal settings. It depends on the photo and the machine you are using. So, don’t worry if you don’t nail it on the first attempt.

Step 3: Clean the glass using a glass cleaner, isopropyl alcohol, or anything else. Make sure there is no dust or fingerprints on it.
If you are using marking paper, soak it in water for five minutes. Remove the backing of the marking paper and paste it on the glass. Spread the marking paper carefully and let it dry. You can also use a hairdryer for quick results.
If you don’t have marking paper, you can use a backing material. It can be anything to trap the heat but should have a dark color. Black is recommended to get excellent results. You can use plywood or any board. Place the backing material under the glass.

Keep in mind that when you engrave using marking paper, the engraving is done on the surface onto which you have applied it. But when you use the backing material, the engraving is done on the surface near the backing material. It means the surface facing the laser bed will be engraved, and the front surface of the glass will remain intact. Thus, you might need to mirror the image in this case.
Step 4: Place the glass in the working area. Adjust the focus of the laser machine. Click on Process and click on Framing. Once you are done with framing the image on the glass, start the process.
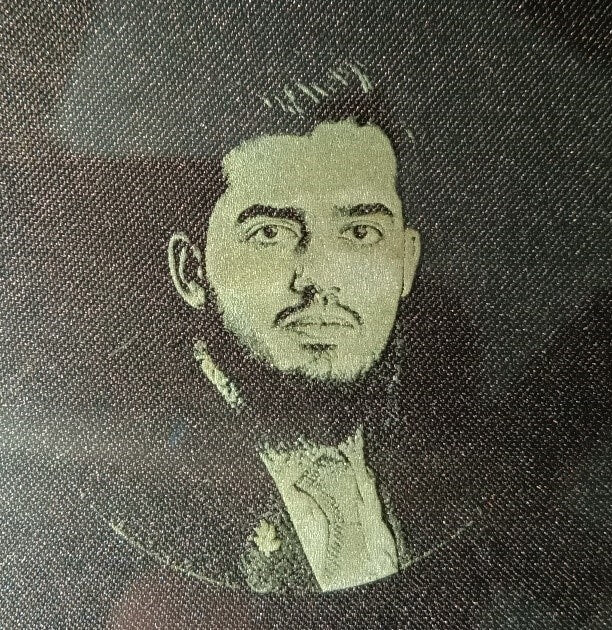
Step 5: After completion, take out the glass and clean it. Place it over a dark background to see the clear results. Your photo has been successfully transferred to the glass.
Conclusion
It is possible to transfer picture to glass using a laser machine. You can use a diode or CO2 laser for this purpose. The engraving on the glass appears to be frosted. It gives a clear view of the photo. We have discussed how to transfer a photo to glass in detail. You can follow the steps and use xTool D1 Pro to get impeccable results. You might need to try it a few times and after that, you will become an expert of glass laser engraving.
For more questions. Please join our Facebook group to get inspired!

Related Posts
![How to Make Stickers on a Cricut: Step-by-Step Guide [Easiest]](http://www.xtool.com/cdn/shop/articles/unload_and_peel_d4f161bf-bdec-4dee-8607-e0007bdbf9af.webp?v=1782392341)
How to Make Stickers on a Cricut: Step-by-Step Guide [Easiest]
How to Sub-Surface Laser Engraving Glass Ball?