
How to Make Earrings? - 3 Ways Explained
Multiple kinds of earrings are already available in the market – but making a customized one; one that perfectly complements your outfit and occasion has its own fun. It allows you to freely explore all options i.e. designs, materials, and colors.
In this article, we will get into different earring-making techniques that cater to various skill levels and aesthetic tastes. We will explore the delicate art of beading, the innovative use of clay for crafting statement pieces, and the precision of laser cutting for creating intricate designs.
In This Article
- How to Make Beaded Earrings?
- How to Make Clay Earrings?
- How to Make Laser Cut Earrings?
- Conclusion
How to Make Beaded Earrings?
LEVEL OF DIFFICULTY: Slightly Challenging
The best part about beads is that they are available in various sizes, shapes, colors, and materials. A bead size can be under 1mm and over 1 cm. In material terms, the spectrum is also huge: wood, acrylic, glass stone, plastic, metals, and many others. This variety and design make them an excellent option to use in earrings.
Materials and Tools Needed
If you want to make those beaded earrings, collect these things before initiating.
- Beads: Choose as per your design theme. But large/jumbo ones with bigger hole sizes would be easy to stitch for beginners.
- Beading Thread: Pick any strong, thin thread that fits through your bead holes. You may pick a softer thread (Nymo Size) for making fringes.
- Beading Needle: Use a thin needle that can easily pass through your chosen beads. The size will depend on the bead hole sizes.
- Ear Wires: Parts of the earring that go through the earlobe, such as hooks or loops.
- Wire Protectors (optional): These small findings help prevent the thread from wearing out where it attaches to the ear wire.
- Pliers (optional): Helpful for bending wire protectors, adjusting ear wires, or flattening the thread for easier threading.
Beaded Earrings Making Ideas
When it comes to beads, you’ve options to try and test different designs:
Gradient Ombre Earrings

Source: IrinaHaluschak - Etsy
These earrings showcase a smooth transition from one color to the next. Start with light hues at the top and gradually blend into darker shades toward the bottom.
Beaded Tassel Earrings

Source: Inbutic - Etsy
Beaded Tassel Earrings feature long, flowing strands of beads that mimic the look of soft tassels. You can vary the length and color of the beads for either a subtle effect or an eye-catching accessory.
Hoop Earrings

Source: MadJewelryCo - Etsy
Hoop Earrings are a timeless design that can be enhanced with beads for a fresh update. Beads can be threaded along the entire hoop or just a segment to add a pop of color and texture.
Fringe Hoop Earrings

Source: RebelinaShop - Etsy
Fringe Hoop Earrings combine the classic appeal of hoops with the dynamic movement of fringe. Beads are attached to the bottom edge of the hoop, often in multiple layers, to create a fringe effect that moves beautifully with the wearer.
Chandelier Earrings

Source: Instructables
These earrings feature several layers of beads that hang from a central fixture, similar to the tiers of a chandelier. The design is elaborate, suitable for formal wear, and catches the light with every movement.
Wire Wrapped Bead Earrings

Source: flowersbyaprilleigh - Etsy
One of the simplest designs to make. Take a large bead and wrap a wire around it to make a simple yet elegant statement piece.
How to Make Beaded Earrings: Step-by-step guide
Step 1: Start with the Foundation Stitch

Thread your needle with a comfortable length (3 to 5 ft.) of beading thread. Pick up six beads and slide them to the bottom, leaving a tail of about 6 inches.

Fold the beads in half to form two rows of three beads each. Pass your needle up through the first row to create a loop. Continue by passing the needle down through the second row and tug gently at both ends to tighten, forming your first two rows of the foundation stitch.
Step 2: Keep Building the Foundation
Add three more beads to your needle. Where the thread exits downwards from the previous row, start from the top of these beads and thread downwards. To stabilize the structure, pass the needle back upwards through these beads.

Create a sturdy 9-row stitch by changing the threading direction with each new row of three beads.
Step 3: First Row of Brick Stitch

Begin a new brick stitch by adding two beads to your needle. Skip the first loop between the beads of the last foundation row and thread through the second loop from the back to the front.
To secure the new beads in place, pass through the left bead, then down through the right bead, and back up through the left bead again – Pull tightly to ensure they stack neatly.
Step 4: Complete the Brick Stitch

Continue adding one bead per stitch. Thread from one loop to the next, and secure each bead as before. The rows will decrease in bead count as you build upwards, which creates a tapered effect.
Step 5: Final Rows and Finishing

For final rows, decrease to two beads and eventually take it to a single bead at the top, securing each one firmly.
To create a loop for the earring hook, pick up six beads, thread down through the bead at the top of your pyramid, loop around, and pass the needle back through these beads to form two rows of three beads each.
Step 6: Adding the Hook
Tie off your work by weaving the thread through the last few beads and tying a knot. Trim any excess thread.
Attach the earring hook by opening the loop on the hook slightly with pliers, hooking it through the loop you created at the top of the earring, and closing it securely.
How to Make Clay Earrings?
LEVEL OF DIFFICULTY: Moderate
Clay is an excellent medium for earring-making due to its soft texture and availability in a wide range of colors, which can be easily mixed to create custom hues.
Materials and Tools Needed
To make clay earrings, get these tools and materials:
- Polymer Clay: It is available in various colors; choose as per your need. Sculpey and Fimo are popular choices.
- Rolling Pin or Pasta Machine: Get either of these tools. It is needed for flattening the clay to an even thickness.
- Shape Cutters: Cookie cutters would work fine for the job.
- Toothpicks or Needle Tools: For making holes and adding fine details.
- Oven: To bake and harden the clay according to package instructions.
- Earring Findings: Get jump rings, earring posts, and backings.
- Pliers: Get a pair of nose pliers to attach the findings to the clay pieces.
- Sandpaper: For smoothing edges after baking.
- Acrylic Paint (optional): For additional decoration.
- Varnish (optional): To seal and protect the painted designs.
Clay Earrings Making Ideas
What could be made? For clay earrings, the choices are multiple.
Marbled Effect Clay Earrings

Source: A Pumpkin and Princess
You can combine two or more colors of polymer clay and twist them together before rolling them out. This creates a beautiful marbled effect. Cut out shapes using cookie cutters for a polished look.
Terrazzo Style Clay Earrings

Source: Cooking my Dreams
Terrazzo, the famous flooring technique, can also be incorporated in earrings. You can create a terrazzo look by mixing small pieces of various colored clay into a base color. Roll out the mixture and cut it into geometric shapes for a trendy, modern accessory.
Textured Discs Earrings

Source: Haven Designs
Round coin-shaped clay bases with uneven textured patterns also look great. You can take a flattened piece of clay, and cut a circular piece out of it. Then, use toothpicks, lace, or stamps to imprint textures. You may layer different sizes and shapes for a dynamic, multi-dimensional effect.
Geometric Shapes

Source: Pinterest
Sometimes simple shapes look elegant too. Try making geometric shapes like circles, squares, or triangles. Use a contrasting color for the stud part and a bolder color for the dangling element to make them pop.
How to Make Clay Earrings: Step-by-Step Guide
Step 1: Condition the Clay

©The Alterierista of Love – YouTube
Before making, the clay needs to be soft. To condition it, knead it with your hands or run it through a pasta machine.
Step 2: Shape the Clay

Roll out the clay using a rolling pin or pasta machine to your desired thickness. Use shape cutters to cut out the earring shapes you want. You can create circles, squares, or more elaborate designs like leaves or abstract shapes.
Step 3: Add Details and Texture

Use stamps or needle-like tools to add textures or intricate details to your shapes. You can also combine different colors of clay to create patterns or marbled effects.
Step 4: Bake the Clay

Once your designs are shaped and detailed, use a toothpick to make a hole where the jump ring will be. Bake the clay pieces in the oven according to the manufacturer’s instructions; mostly 275F is recommended for polymer clay. Ensure the temperature is accurate to prevent burning.
Step 5: Sand and Paint

After the clay has cooled, sand any rough edges for a smooth finish. If desired, paint your earrings with acrylic paints for extra color or effects. Seal the paint with a layer of varnish to protect it.
Step 6: Assemble the Earrings

Attach the earring findings using pliers. Insert jump rings through the holes you made before baking, then connect the rings to the earring posts or hooks.
Double-check all connections to ensure they are secure. Your handmade clay earrings are now ready to wear or give as a personalized gift!
How to Make Laser Cut Earrings?
LEVEL OF DIFFICULTY: Easy
The simplest of all methods – laser cutting. A high-beam laser with programmed settings cuts the material with extreme accuracy. The process is highly accessible, thanks to compact desktop laser cutters and engravers that are easy to use. All you need to start is a design file, a sheet of your chosen material, and a laser cutting machine.
These machines are versatile and can work with a wide array of materials, including wood, leather, acrylic, stone, and cardboard. They can cut and engrave these materials with fine detail and high accuracy. Operation is not only simple but also safe. Many desktop lasers, such as the xTool S1, come equipped with safety features like laser filtering lids and fire safety protocols to ensure a secure crafting experience.
Materials and Tools Needed
For laser cut earrings, you will only need a few things:
- A Laser-Compatible Material: Generally, a laser machine is compatible with all common materials like paper, wood, acrylic, cardboard, fabric, and leather. However, we recommend using laser-compatible material sheets for effective cutting with a laser. You can visit the xTool store, and check out the collection of material sets.
- A Laser Cutter and Engraver: Compact lasers come in diode and CO2 laser technology. If you’re a beginner, you can choose an affordable diode laser: xTool M1 or xTool S1. For businesses, xTool P2 is the best CO2 laser machine.
Laser-Cut Earrings Making Ideas
Since lasers can cut and engrave multiple materials, you have plenty of options to create.
Laser Cut and Engraved Wood Earrings
Wood provides a warm, natural texture that is perfect for earrings. With a laser machine, you can carve intricate designs, and leverage wood’s natural grain to enhance the visual appeal. Try making nature-inspired designs, for instance, leaves. Try geometric patterns or even personalized text. To finish, you can stain or paint the wood to bring out the natural grain or add vibrant colors.
Acrylic Earrings

Acrylic is versatile for laser cutting due to its wide range of available colors and the clean, polished edges it maintains after cutting. You can create everything from sleek, modern designs to fun, playful shapes like animals, abstract forms, or even layered 3D effects. Try translucent, glitter, or mirrored acrylic sheets to add a unique flair to your designs.
Layered Leather Earrings

Leather’s natural texture and smooth grain make it ideal for layered or tiered earring designs. You can make floral motifs, intricate lace designs, or modern abstract shapes. Combine different colors and textures of leather to enhance depth and interest.
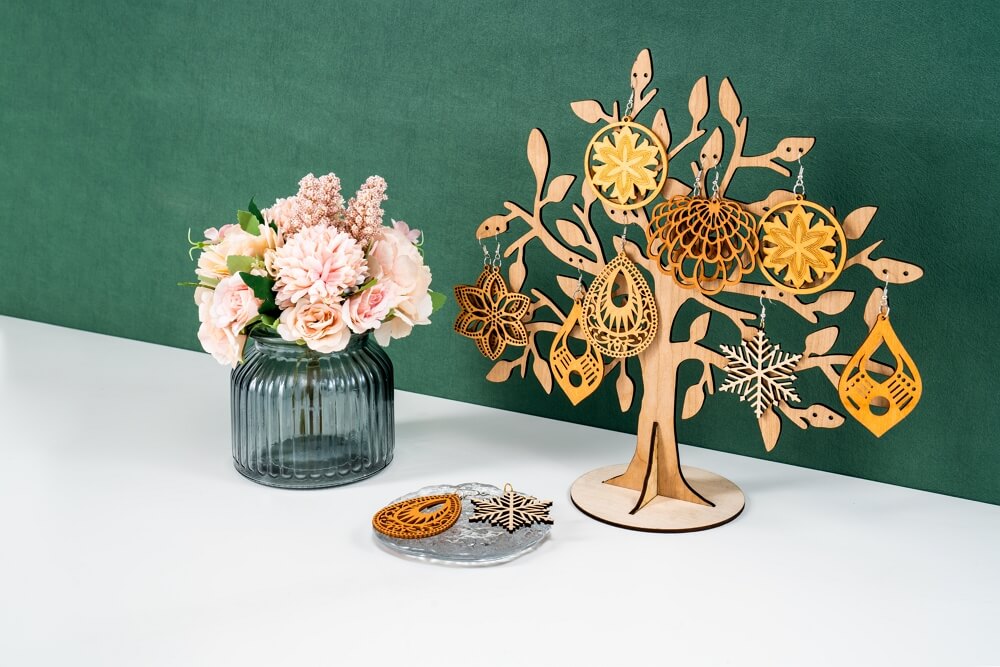
Seasonal Earrings
You can also custom-design earrings for specific holidays and celebrations using themes and icons associated with each event. For instance:

- Christmas: Design earrings shaped like Christmas trees, stars, or snowflakes with traditional red, green, and gold colors.
- Halloween: Opt for spooky designs such as ghosts, pumpkins, and skulls. Black and orange acrylic can be used for a classic Halloween look.
- Party Themes: Create earrings that match party themes, like balloon-shaped earrings and cakes for birthdays.
How to Make Earrings with Laser: Step-By-Step Guide
Step 1: Prepare a Design

Design is crucial. If you’re skilled in design, create your own file. If not, don’t worry. There are plenty of pre-made laser cut files for earrings available online. Check out resources like xTool Projects or Etsy for design ideas.
Step 2: Setup the Laser Machine
Position the material inside the laser machine. Select the appropriate material settings as well as power and speed settings for cutting. If you’re using xTool laser cutters, follow their recommended settings for different materials.
Step 3: Laser Cut the Material

Prior to laser cutting, press the framing button. The laser moves across the laser machine to provide a preview of the laser path. If the setup looks good, go ahead and start the cutting process
Step 4: Paint/Seal the Engravings

Once cutting is complete, paint and assemble your earrings. If needed, apply a sealant to protect the paint and enhance the durability of your earrings. Finally, add hooks to the earrings.
Conclusion
The market is filled with numerous earring options, but the joy of crafting your own earrings—whether with beads, clay or through laser cutting—is immensely satisfying. Each method has its unique charm, but laser cutting is arguably the easiest. It allows you to experiment with a variety of materials with ease and comfort. You don’t need much—just a laser cutter, a design, and a thin sheet of material, possibly something you already have at home.
For more questions. Please join our Facebook group to get inspired!


